
Arduino programming is at the heart of creating interactive electronic projects — from blinking LEDs to complex automation systems. Learning how to write code for an Arduino board opens endless possibilities for hobbyists, students, and engineers alike.
In this guide, you’ll learn what Arduino programming is, how the Arduino programming language works, and how to write your first program (called a sketch). You’ll also explore tools, tips, and frequently asked questions to build your confidence as you start your Arduino coding journey.
Table of Contents
- What Is Arduino Programming?
- Getting Started with Arduino Programming
- Arduino Programming Example
- Understanding the Arduino Programming Language
- Example: Simple LED Blink Program
- Your Own Arduino Programming
- Common Tools for Arduino Programming
- Advanced Concepts in Arduino Coding
- Tips for Arduino Programming
- Did You Know About Arduino Programming?
- Frequently Asked Questions About Arduino Programming
- What is Arduino programming used for?
- Is the Arduino coding language hard to learn?
- What programming language is used in Arduino?
- Can I use Python for Arduino programming?
- What’s the difference between Arduino IDE and PlatformIO?
- How do I fix common Arduino programming errors?
- Can I run multiple programs on an Arduino?
- Conclusion
What Is Arduino Programming?
Arduino programming is the process of writing and uploading code to control an Arduino microcontroller board. Each program (or sketch) is a set of instructions that tell the microcontroller how to behave — for example, when to turn on an LED, read sensor data, or move a motor.
The programming language in Arduino is based on C and C++, but with simplified functions that make it beginner-friendly. The Arduino development environment handles the behind-the-scenes complexity, so you can focus on logic rather than low-level electronics.
When people refer to the Arduino coding language, they usually mean the same simplified version of C/C++ used in the Arduino IDE.
Getting Started with Arduino Programming
Before diving into Arduino coding, you’ll need the following:
- An Arduino board (such as Uno, Nano, or Mega) — the Arduino Uno board is popular with beginners
- A USB cable to connect it to your computer
- The Arduino IDE (Integrated Development Environment)
Once installed, follow these steps:
- Connect your Arduino board to your computer using a USB cable.
- Open the Arduino IDE.
- Select your board type (e.g., Arduino Uno) under Tools → Board.
- Choose the correct serial port.
- Write or paste your sketch into the editor.
- Verify the code by clicking the checkmark icon.
- Upload the code to the board by clicking the right-arrow icon.
When you upload successfully, your Arduino board will run your program automatically.
Arduino Programming Example
The Arduino IDE software has built-in programs or sketches. One of these sketches is the Blink sketch. When loaded to an Arduino board, the Blink sketch blinks the on-board LED. That is, it flashes the on board LED of the Arduino board on and off at a certain rate that is visible to the human eye. In this section we follow the instructions from the previous section to load the Blink sketch to an Arduino Uno board.
Install the Arduino IDE
Before starting, go to the Arduino IDE download page and download the IDE for your operating system. The Arduino IDE software is available for Windows, Linux, and macOS, so choose the correct one for the operating system on your computer. Follow the Arduino instructions on installing the Arduino IDE software.
Connect the Arduino Board to the Computer
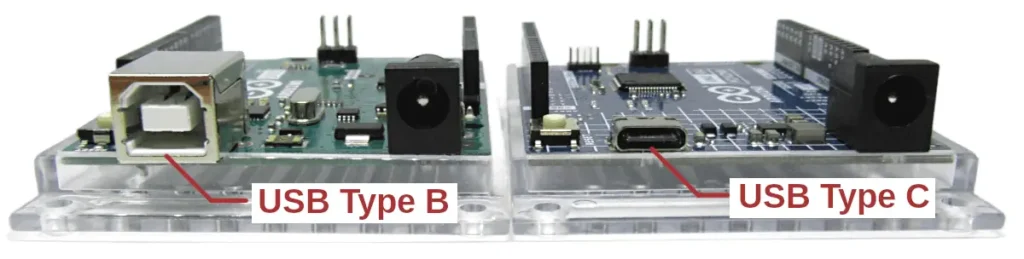
Use a USB cable to connect the Arduino Board to a USB port on your computer. The USB cable is used for both powering the Arduino board and for programming it. Arduino Uno R3 boards require a USB type A to USB type B cable, also called a USB type A-B cable. On the other hand, an Arduino Uno R4 board requires a USB type C cable.
Both USB connector types are shown in the image below with the Arduino Uno R3 on the left and Arduino Uno R4 on the right.
Open the Arduino IDE and Select the Board
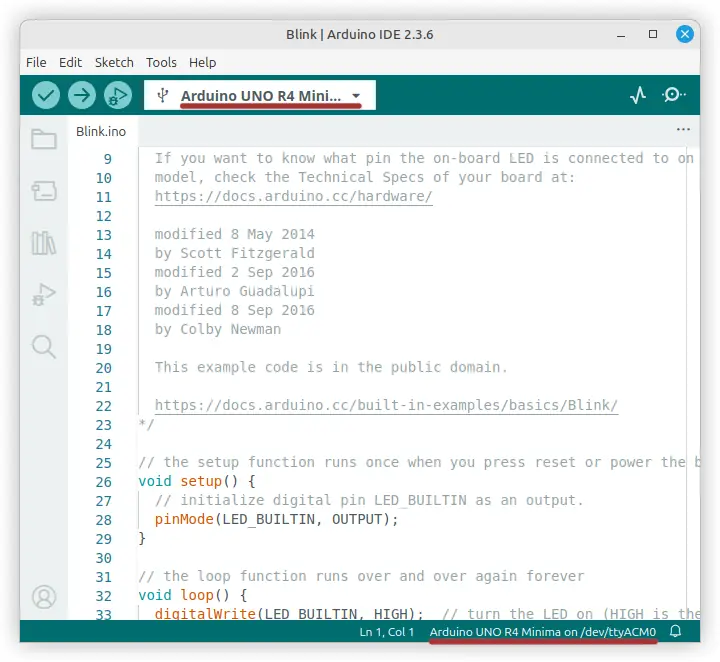
After connecting the Arduino board to the computer USB port, start the Arduino IDE software. Select the correct Arduino board using the top menu of the Arduino IDE software: select Tools → Board and then select the correct board from the pop out menu. For example select Arduino Uno R4 Boards → Arduino UNO R4 Minima if using an Uno R4 Minima board.
Select Tools → Port from the top IDE menu and then select the port that the board is connected to on the pop-out menu. When an Arduino Uno is connected to a computer USB port it appears as a virtual serial port and will be seen on the port menu in the Arduino IDE.
After selecting the board and port in the Arduino IDE, the selections can be seen at the bottom right of the IDE window. Board and port selections can also be seen at the top of the Arduino IDE window where they can be clicked to change them, as the following image shows. These items are underlined in red in the image.
Open the Blink Sketch
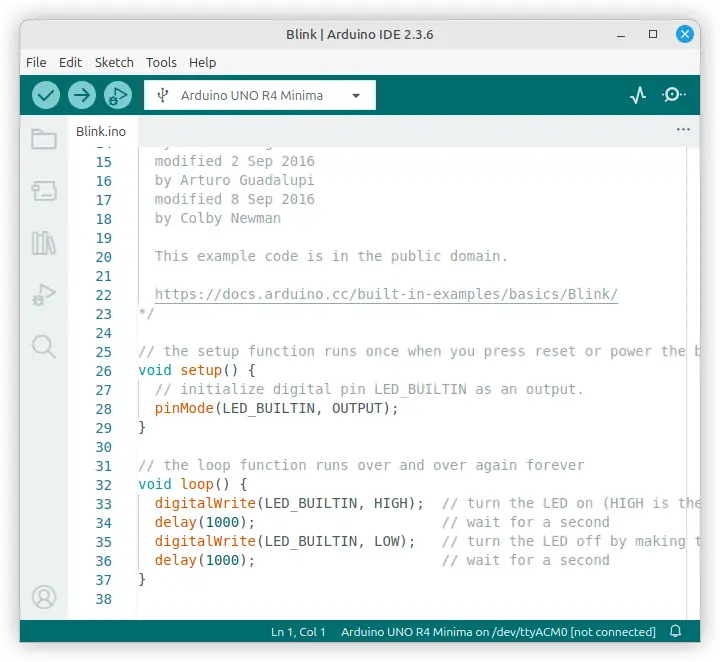
Before programming the Arduino board, we must open the sketch to program it with. In this example we are using the built-in Blink sketch that can be found in the Arduino IDE. Select File → Examples → 01.Basics → Blink from the top menu of the Arduino IDE software. This opens the Blink sketch in a new IDE window.
At this stage, the sketch can be checked if desired by clicking the checkmark or tick icon on the top toolbar of the IDE window. Alternately, choose Sketch → Verify/Compile from the top menu. This step is optional and can be used to verify if any sketch is valid. It is also possible to go straight to the upload step first, as this automatically does a verify/compile before uploading the sketch to the board.
Click the right arrow icon (Upload) on the top IDE toolbar to load the Blink sketch to the Arduino board. Alternately, select Sketch → Upload from the top menu. This uploads the Blink sketch (or the sketch that is currently open) to the Arduino board.
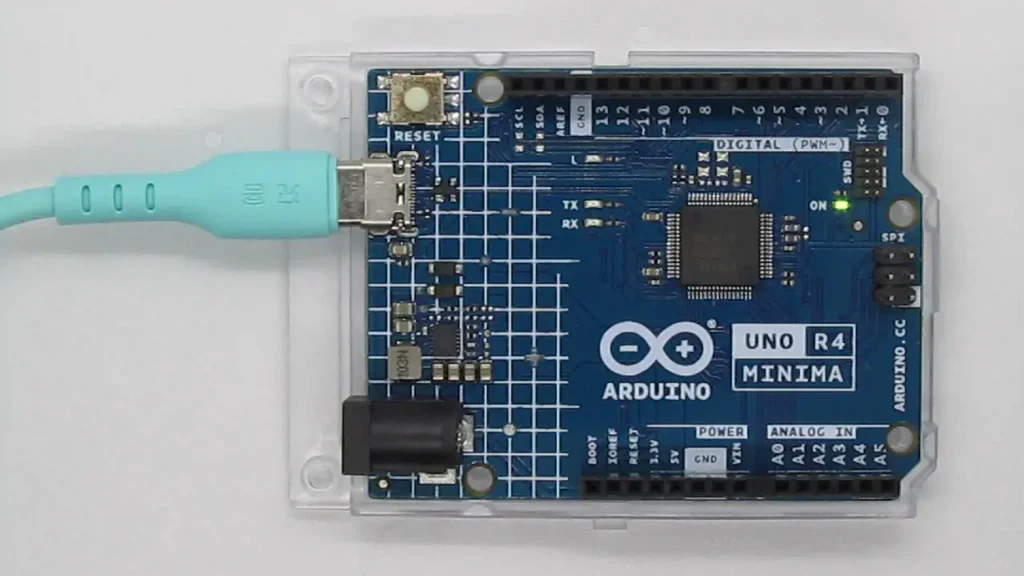
In the case of our Blink sketch the sketch will upload to the Arduino board and start running. This means that the on-board LED starts blinking or flashing on and off. The following image shows the Blink sketch running on an Arduino Uno R4 Minima board. If the LED is not blinking, click the image to see the animation.
Understanding the Arduino Programming Language
The Arduino programming language is essentially C/C++ with some simplifications and pre-built libraries.
Every Arduino sketch consists of two main functions:
void setup() {
  // Runs once when the board starts
}

void loop() {
  // Runs repeatedly after setup()
}
These functions make Arduino coding straightforward. The setup() function initializes things like pin modes and serial communication. These are things that only need to run once when the board is powered up or reset.
The loop() function continuously executes your program logic — making it perfect for controlling devices in real time. This is where the main program code runs continually. The idea is to initialize the hardware in the setup part of the sketch and then run the main program or sketch code in the loop part of the sketch.
Common built-in functions include:
| Function | Description |
|---|---|
pinMode(pin, mode) | Sets a pin as INPUT or OUTPUT |
digitalWrite(pin, value) | Turns a digital pin HIGH or LOW |
digitalRead(pin) | Reads the state of a digital pin |
analogRead(pin) | Reads analog input from a sensor |
delay(ms) | Pauses the program for a specified time |
By combining these simple functions, you can create powerful and interactive circuits.
Example: Simple LED Blink Program
Here’s the classic “Hello World” of Arduino programming — blinking an LED. This code does the same as the Blink example sketch that we already ran.
void setup() {
  pinMode(13, OUTPUT); // Set pin 13 as output
}

void loop() {
  digitalWrite(13, HIGH); // Turn LED on
  delay(1000);            // Wait 1 second
  digitalWrite(13, LOW);  // Turn LED off
  delay(1000);            // Wait 1 second
}
Upload this sketch to your Arduino Uno, and the onboard LED will start blinking once per second. In this case the pin that the LED is connected to is directly accessed. On Arduino Uno boards the on-board LED is connected to pin 13.
This simple example demonstrates how easy Arduino coding can be — just a few lines of code control real hardware.
Arduino Blink Sketch Comparison
Compare the previous code with the Blink sketch code below. The Blink sketch code without the top comments is shown below for simplicity. LED_BUILTIN is used in the blink sketch below, as this is defined as the pin with the on-board LED connected to it. The value of LED_BUILTIN changes, depending on which board is selected in the Arduino IDE. In this way, the Blink sketch works for all Arduino boards that have an on-board LED. On the other hand, the previous sketch only works for boards that have the on-board LED connected to pin 13.
// the setup function runs once when you press reset or power the board
void setup() {
  // initialize digital pin LED_BUILTIN as an output.
  pinMode(LED_BUILTIN, OUTPUT);
}

// the loop function runs over and over again forever
void loop() {
  digitalWrite(LED_BUILTIN, HIGH);  // turn the LED on (HIGH is the voltage level)
  delay(1000);                      // wait for a second
  digitalWrite(LED_BUILTIN, LOW);   // turn the LED off by making the voltage LOW
  delay(1000);                      // wait for a second
}How the Blink Sketch Works
The blink sketch is pretty straight forward and is explained in the comments in the sketch. Comments are the text that starts with two forward slashes ( // ). Comments are notes typed in by a programmer that remind the programmer what parts of the code does.
The setup() Function
At the start of the sketch the setup() function runs once. This function runs the code that is between the opening brace { and the closing brace } that appear after the function name. One line of code appears between these braces: a call to the pinMode() function.
Arduino pins can be set up as input pins to read a value, or output pins to output a high or low voltage. The pinMode() function sets up the pin connected to the on-board LED as an output in the Blink sketch. This allows the later code to switch this pin as an output. In other words it can be switched high or low (on or off) by other code once set up as an output pin.
The loop() Function
After running the setup() function once, the code in the loop() function is run continually. The first line of code in this function switches the pin to a high or on state. This causes the on-board LED attached to it to switch on. delay() is called after this and given a value of 1000 milliseconds, which is the same as one second. In other words, it leaves the LED on for one second.
The third line of code in the loop() function switches the LED off. This is done by switching the pin attached to the LED to a low or off state. Finally the delay() function is called again. The result is that the LED switches off for one second.
Code execution starts at the top of the loop again where the LED is switched back on for one second and then off for one second, and so on.
Your Own Arduino Programming
As a first step in learning Arduino programming, modify the Blink sketch. Modify this sketch to make the LED blink faster and then slower. Also change the on and off times of the LED to be different.
Make the LED Blink Faster
Open the Blink sketch and then modify it by changing the LED delay periods. Change them to 500 milliseconds for a start. This makes the LED blink faster. The modified code is shown below. Save the sketch as your own, under a name such as my_blink so that you do not overwrite the original sketch. Experiment and try other values that are smaller than 1000.
In programming terminology when the delay() function is called with a value between its brackets, such as delay(500), it is said that we are passing the value of 500 to the delay() function.
void setup() {
  pinMode(LED_BUILTIN, OUTPUT);
}

void loop() {
  digitalWrite(LED_BUILTIN, HIGH);
  delay(500);
  digitalWrite(LED_BUILTIN, LOW);
  delay(500);
}Make the LED Blink Slower
Pass a bigger value to the delay() function. This makes the LED blink or flash slower. For example delay(2000) causes a two second delay. This means that the LED is on and off for two seconds each time.
Change the LED On and Off Times
Try delay(200) to leave the LED on for 200 milliseconds, or 0.2 seconds. Combine this with delay(1000) for the LED off time. The LED then flashes on very briefly compared to the time that it is left off for. This is shown in the following code.
void setup() {
  pinMode(LED_BUILTIN, OUTPUT);
}

void loop() {
  digitalWrite(LED_BUILTIN, HIGH);
  delay(200);
  digitalWrite(LED_BUILTIN, LOW);
  delay(1000);
}Common Tools for Arduino Programming
Several tools help streamline Arduino programming and improve workflow:
- Arduino IDE: The official tool for writing and uploading sketches.
- Arduino Web Editor: Runs in your browser and saves sketches to the cloud.
- PlatformIO (VS Code): Ideal for advanced users who prefer version control, IntelliSense, and debugging.
- Serial Monitor: Displays live data from your Arduino for debugging or monitoring sensors.
Most beginners start with the Arduino IDE, then transition to PlatformIO as their projects grow.
Advanced Concepts in Arduino Coding
Once you’re comfortable with basic Arduino coding, explore more advanced topics:
Libraries
Libraries expand the Arduino coding language with pre-made code for sensors, motors, and displays. You can install them directly from the Arduino IDE under Sketch → Include Library → Manage Libraries.
Data Types and Variables
The Arduino programming language supports familiar types like int, float, char, and String. Using the right data type ensures accuracy and efficiency.
Control Structures
You can use if, else, for, and while loops just as in standard C++. These structures form the logic behind most Arduino projects.
Interrupts and Timers
For more complex projects, Arduino boards can handle interrupts — responding instantly to external events without waiting for the loop to finish.
Tips for Arduino Programming
- Start simple: Begin with LED or button projects before adding sensors or displays.
- Comment your code: Describe what each section does to make debugging easier.
- Use the Serial Monitor: Print sensor readings and variable values for troubleshooting.
- Break large projects: Test one module at a time before combining features.
- Avoid blocking code: Replace long
delay()calls with non-blocking techniques likemillis(). - Save often: Keep copies of working sketches before experimenting with major changes.
- Read datasheets: Knowing how components behave will make Arduino coding more predictable.
Did You Know About Arduino Programming?
- The first Arduino board was released in 2005 at the Interaction Design Institute Ivrea in Italy.
- “Arduino” was named after a bar in Ivrea where the project’s founders met.
- There are now millions of Arduino boards used globally in education, research, and industry.
- The Arduino programming language and hardware are open-source, which means anyone can build compatible boards and contribute libraries.
Frequently Asked Questions About Arduino Programming
What is Arduino programming used for?
Arduino programming is used to control microcontrollers that interact with sensors, motors, LEDs, and other electronics. It’s ideal for DIY, robotics, and embedded systems.
Is the Arduino coding language hard to learn?
No. The Arduino coding language is beginner-friendly and designed to help newcomers learn the basics of embedded programming without deep technical complexity.
What programming language is used in Arduino?
The primary programming language in Arduino is a simplified version of C and C++ with pre-built functions and libraries.
Can I use Python for Arduino programming?
Yes, with additional tools like MicroPython or Firmata, but most Arduino tutorials use the native Arduino programming language for simplicity and compatibility.
What’s the difference between Arduino IDE and PlatformIO?
The Arduino IDE is beginner-focused, while PlatformIO (used with VS Code) offers advanced project management, debugging, and integration with version control systems.
How do I fix common Arduino programming errors?
Check your board and port settings, ensure correct library installation, and verify your syntax. The IDE’s error messages will guide you to the problem.
Can I run multiple programs on an Arduino?
No, each uploaded sketch replaces the previous one. However, you can design a single sketch to perform multiple tasks.
Conclusion
Learning Arduino programming opens the door to creative electronics projects — from simple gadgets to complex prototypes. By understanding the Arduino programming language, mastering Arduino coding, and using the right tools, you’ll gain hands-on experience in controlling hardware through software.
Start small, experiment often, and explore the world of embedded systems one project at a time. With practice and curiosity, Arduino programming can become your gateway to engineering innovation.
Now that you have learned the basics of Arduino programming, the next step is to learn about the Arduino serial monitor.
You may also be interested in how thermistors work with Arduino examples.