
The Arduino serial monitor is a simple but powerful tool in the Arduino IDE that lets you send and receive text between your computer and an Arduino board. Beginners use the Arduino serial monitor to view sensor values, debug code with Serial.print(), and test serial communication without extra hardware.
Table of Contents
- How the Arduino Serial Monitor Works
- Opening the Arduino IDE Serial Monitor
- Arduino Print to Serial Monitor — Quick Example
- How to Clear the Arduino IDE Serial Monitor Window
- Arduino Serial Port Monitor vs. Terminal Apps
- Tips for the Arduino Serial Monitor
- Did You Know About the Arduino Serial Monitor?
- Frequently Asked Questions About the Arduino Serial Monitor
- Conclusion
How the Arduino Serial Monitor Works
The Arduino serial monitor opens a serial connection to the board over the USB serial port. When your sketch calls Serial.begin(9600) and then Serial.print() or Serial.println(), those messages appear in the Arduino serial monitor window. You must select the correct baud rate and the right COM (serial) port for reliable communication.
Common Steps to Open and Configure
- Connect your Arduino to USB.
- In the Arduino IDE go to Tools → Port and choose the board port (the Arduino serial port monitor reads from this).
- Click the magnifier icon or choose Tools → Serial Monitor to open the Arduino IDE serial monitor.
- Set the baud rate to match
Serial.begin().
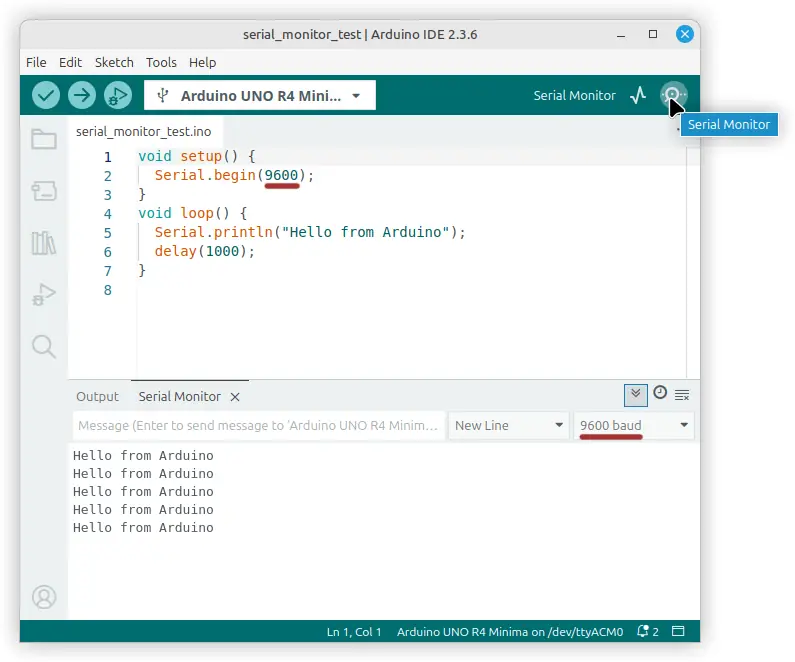
The following image shows the serial monitor window toolbar button in the Arduino IDE at the top right. At the bottom of the IDE is the serial monitor pane that shows text sent from the Arduino board to the monitor. Note that the baud rates underlined in red must match for the text to be displayed properly. That is, the setting in the sketch code, and the setting shown at the top right of the serial monitor pane must be the same. For example, in the image they are both 9600.
In the old IDE software (version 1.x), the serial monitor opens as a separate window. However, in the new version 2.x software, the serial monitor opens as a pane at the bottom of the IDE window.
Opening the Arduino IDE Serial Monitor
The Arduino IDE serial monitor is available from the toolbar or the Tools menu. You can also use keyboard shortcut (Ctrl+Shift+M) in many installations. If you see gibberish, check the baud rate and ensure the sketch calls Serial.begin() early in setup().
Arduino Print to Serial Monitor — Quick Example
Use these basic lines in your sketch:
void setup() {
  Serial.begin(9600);
}
void loop() {
  Serial.println("Hello from Arduino");
  delay(1000);
}
This example demonstrates how to print to the serial monitor from an Arduino board repeatedly. In the setup() part of the sketch, Serial.begin(9600) is called. This sets up the Arduino USB serial port to a baud rate of 9600. Set the baud rate in the serial monitor window to the same baud rate.
In the loop() part of the sketch, Serial.println() is called with a text string passed to it. This causes the Arduino to send the text string message to the serial monitor window where it is displayed. It also moves the invisible cursor to the next line in the window, so that the next message received by the serial monitor is printed below the current message. Serial.print() puts all the text on the same line.
Finally, the delay() function is called and is passed a value of 1000. This causes the program or sketch to pause for one second (1000 milliseconds) before the message is sent to the serial monitor window again. Because this code is in the loop, it repeats over and over. As a result, the message is sent to the serial monitor window every second continually.
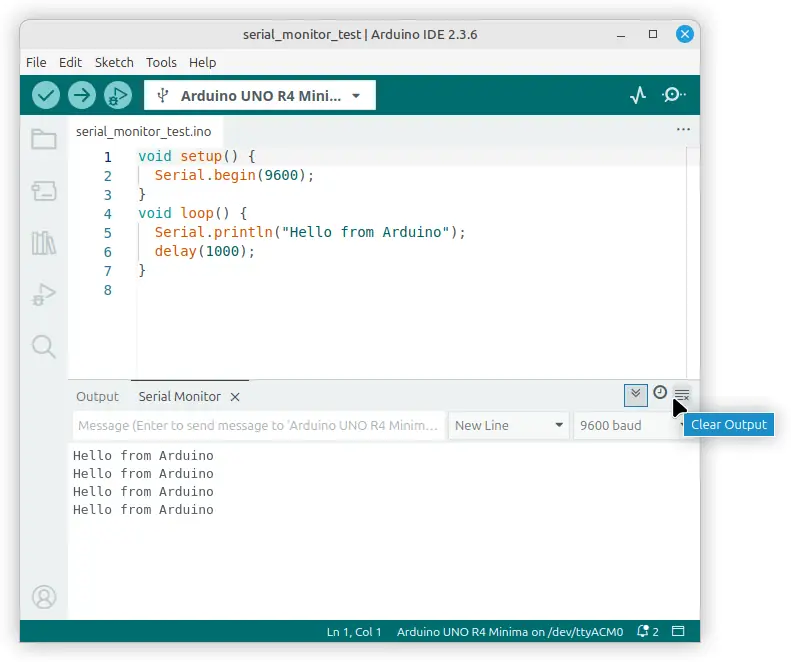
How to Clear the Arduino IDE Serial Monitor Window
In version 2.x of the Arduino IDE software, click the Clear Output icon at the top right of the serial monitor pane. The image below shows the pop-out tool tip and cursor marking this icon. Simply click it to clear all of the text from the serial monitor pane.
Arduino Serial Port Monitor vs. Terminal Apps
The Arduino serial port monitor inside the IDE is easy for beginners. Advanced users sometimes use external serial terminal programs (PuTTY, screen) which function as an Arduino serial port monitor but offer extra features like logging.
Tips for the Arduino Serial Monitor
- Match baud rates between
Serial.begin()and the monitor. - Use
Serial.println()for line-separated logs. - To clear the window quickly, close and reopen the monitor or use the Arduino clear serial monitor button/command if your IDE supports it.
- Prefix debug lines with tags (e.g.,
TEMP:) for easier parsing.
Did You Know About the Arduino Serial Monitor?
- Early Arduino IDEs first added the serial monitor in 2005–2006 to simplify debugging for hobbyists.
- The serial monitor can send text back to your sketch; read it with
Serial.read()to control the board from your keyboard.
Frequently Asked Questions About the Arduino Serial Monitor
How do I clear the Arduino Serial Monitor?
Closing and reopening the monitor clears the screen; some IDE versions include a clear button labeled ‘Clear Output’ in order to clear serial monitor window in the Arduino IDE. In IDE version 2, hover the mouse cursor over the icon at the top right of the serial monitor window to see the tool tip pop up.
Which port should I select in the Arduino Serial Monitor?
Choose the port shown under Tools → Port. If unsure, unplug and replug the board and note which port appears.
Can I use the serial monitor to send commands?
Yes. Type into the input at the bottom of the Arduino IDE serial monitor to send strings to your sketch; use Serial.read() to process them.
Conclusion
The Arduino serial monitor is an essential, beginner-friendly tool for viewing and sending serial data to an Arduino. Whether you’re using Serial.print() to debug, selecting the right Arduino serial port monitor, or learning how to clear the window, mastering the serial monitor speeds up development and troubleshooting. Use the steps and tips above to get reliable serial communication in your projects.
To start programming or writing sketches for Arduino, see the Arduino Programming Made Easy article.